
We want to make our small living space as big as possible, that’s why we expand it by some outside space, like a patio. Therefore we equip our Sprinter with an awning: the Fiamma F65 S!
The awning makes it possible to enlarge the tiny space of the van without much effort. The awning is rolled out quickly and the supporting legs are easily stuck into the ground or to the vehicle. In less than no time you have a shady place to sit and enjoy. Just like you would on a patio, but with an ever changing view.
The most common manufacturers of awnings for motorhomes are Dometic, Fiamma and Thule. We chose the following retractable roof awning, operated by handle by Fiamma:
- Type: F65 S 290
- Housing made of reinforced aluminum in the color Deep Black (also available in Polar White and Titanium)
- Multi-layered fabric, waterproof and UV resistant made of vinyl in the color Royal Grey (also available in Royal Blue)
- Total length of the awning: 290 cm
- Width of the fabric: 278 cm
- Length of the fabric: 200 cm
- Shadow surface: 5,6 m²
- Weight: 25 kg
Delivery includes the awning, the handle, the pegs to stick the supporting legs into the ground or the brackets to stick them to the vehicle
Delivery does not include the vehicle specific bracket
Vehicle specific bracket for the awning Fiamma F65 S
Every vehicle is different, therefore different brackets or adaptors are necessary to install the awning. These brackets are available for lots of common vehicles: Mercedes Sprinter, VW Crafter, Iveco Daily, Fiat Ducato, Citroën Jumper, Peugeot Boxter, Renault Master or RVs from Carthago or Hymer. The Mercedes Sprinter and the VW Crafter are very “similar” to each other, that is why there is only one bracket for both kinds of vehicles, you just differentiate High Roof, Roof Rail and Right Hand Drive.
We need the brackets for the Mercedes Sprinter (and VW Crafter) with High Roof, without Roof Rail and no Right Hand Drive!
Delivery includes three brackets (1x 60 cm / 1x 12 cm / 1x 53 cm), screws, self-locking nuts and shims to attach the brackets to the roof as well as to attach the awning to the brackets, and adjusting pieces for the front and back bracket so they can be installed straight
Delivery does not include adhesive Sikaflex 252i and the cleaning products (activator and primer) to additionally glue the brackets to the roof
Construction adhesive Sikaflex 252i
The skin of the roof is quite thin, so it does not guarantee a lot of screw-tightness, that is why in addition to the fastening with screws and self-locking nuts, the brackets for the awning should also be glued to the roof; for this the manufacturer of the awning, Fiamma, recommends using Sikaflex 252i.
Sikaflex 252i is glue that at the same time has a sealing function (just like silicone you would use in a bathroom) by reacting or rather setting with humidity.
The adhesive Sikaflex 252i is recommended for permanently elastic and dynamically worn adherences. We will always be moving with the Sprinter and the awning on top, which is why an adhesive with this particular quality fits very well. One more and very important advantage of this adhesive is its weather and water persistence (e.g. rain and sea water) because it is for outside use.
Cleaning product to prepare the surface
The lower surface of the brackets and the surface of the roof to which the brackets will be glued with Sikaflex, have to be clean and dry as well as free of dust and grease. We got a cleaning set consisting of sanding fleece, MT-Activator and MT-Primer.
What else you need to install the awning
- At least 2 people and 2 ladders to lift up the awning and place it on the brackets
- Cordless drill
- Primer/Foundation
- Screwdriver and wrench
- Lint-free cloth (microfiber cloth)
- 2 small brushes without hair loss
- Tape measure and/or measuring stick (optional; to measure)
- Masking tape and pen (optional; to mark)
- Garbage bag (optional; as a makeshift catch for metal cuttings) / vacuum cleaner (optional; as a little less makeshift catch for metal cuttings)
STEP BY STEP Installation of the awning
STEP 1: Preparation
To realize a project, we pretty much always have to take a trip to the hardware store first to get all the necessary tools and materials. Neither are we professional craftsmen nor do we have a fully-equipped workshop on our disposal.
We already listed everything that is required to install the awning above. We took all of this information out of the assembly manuals and information sheets which are available online. Take a look.
- Installation manual Awning Fiamma F65 S
- Installation manual for vehicle specific brackets for Fiamma F65 S
- Product- and Safetyinformation Sikaflex 252 i
STEP 2: Measuring and Taping
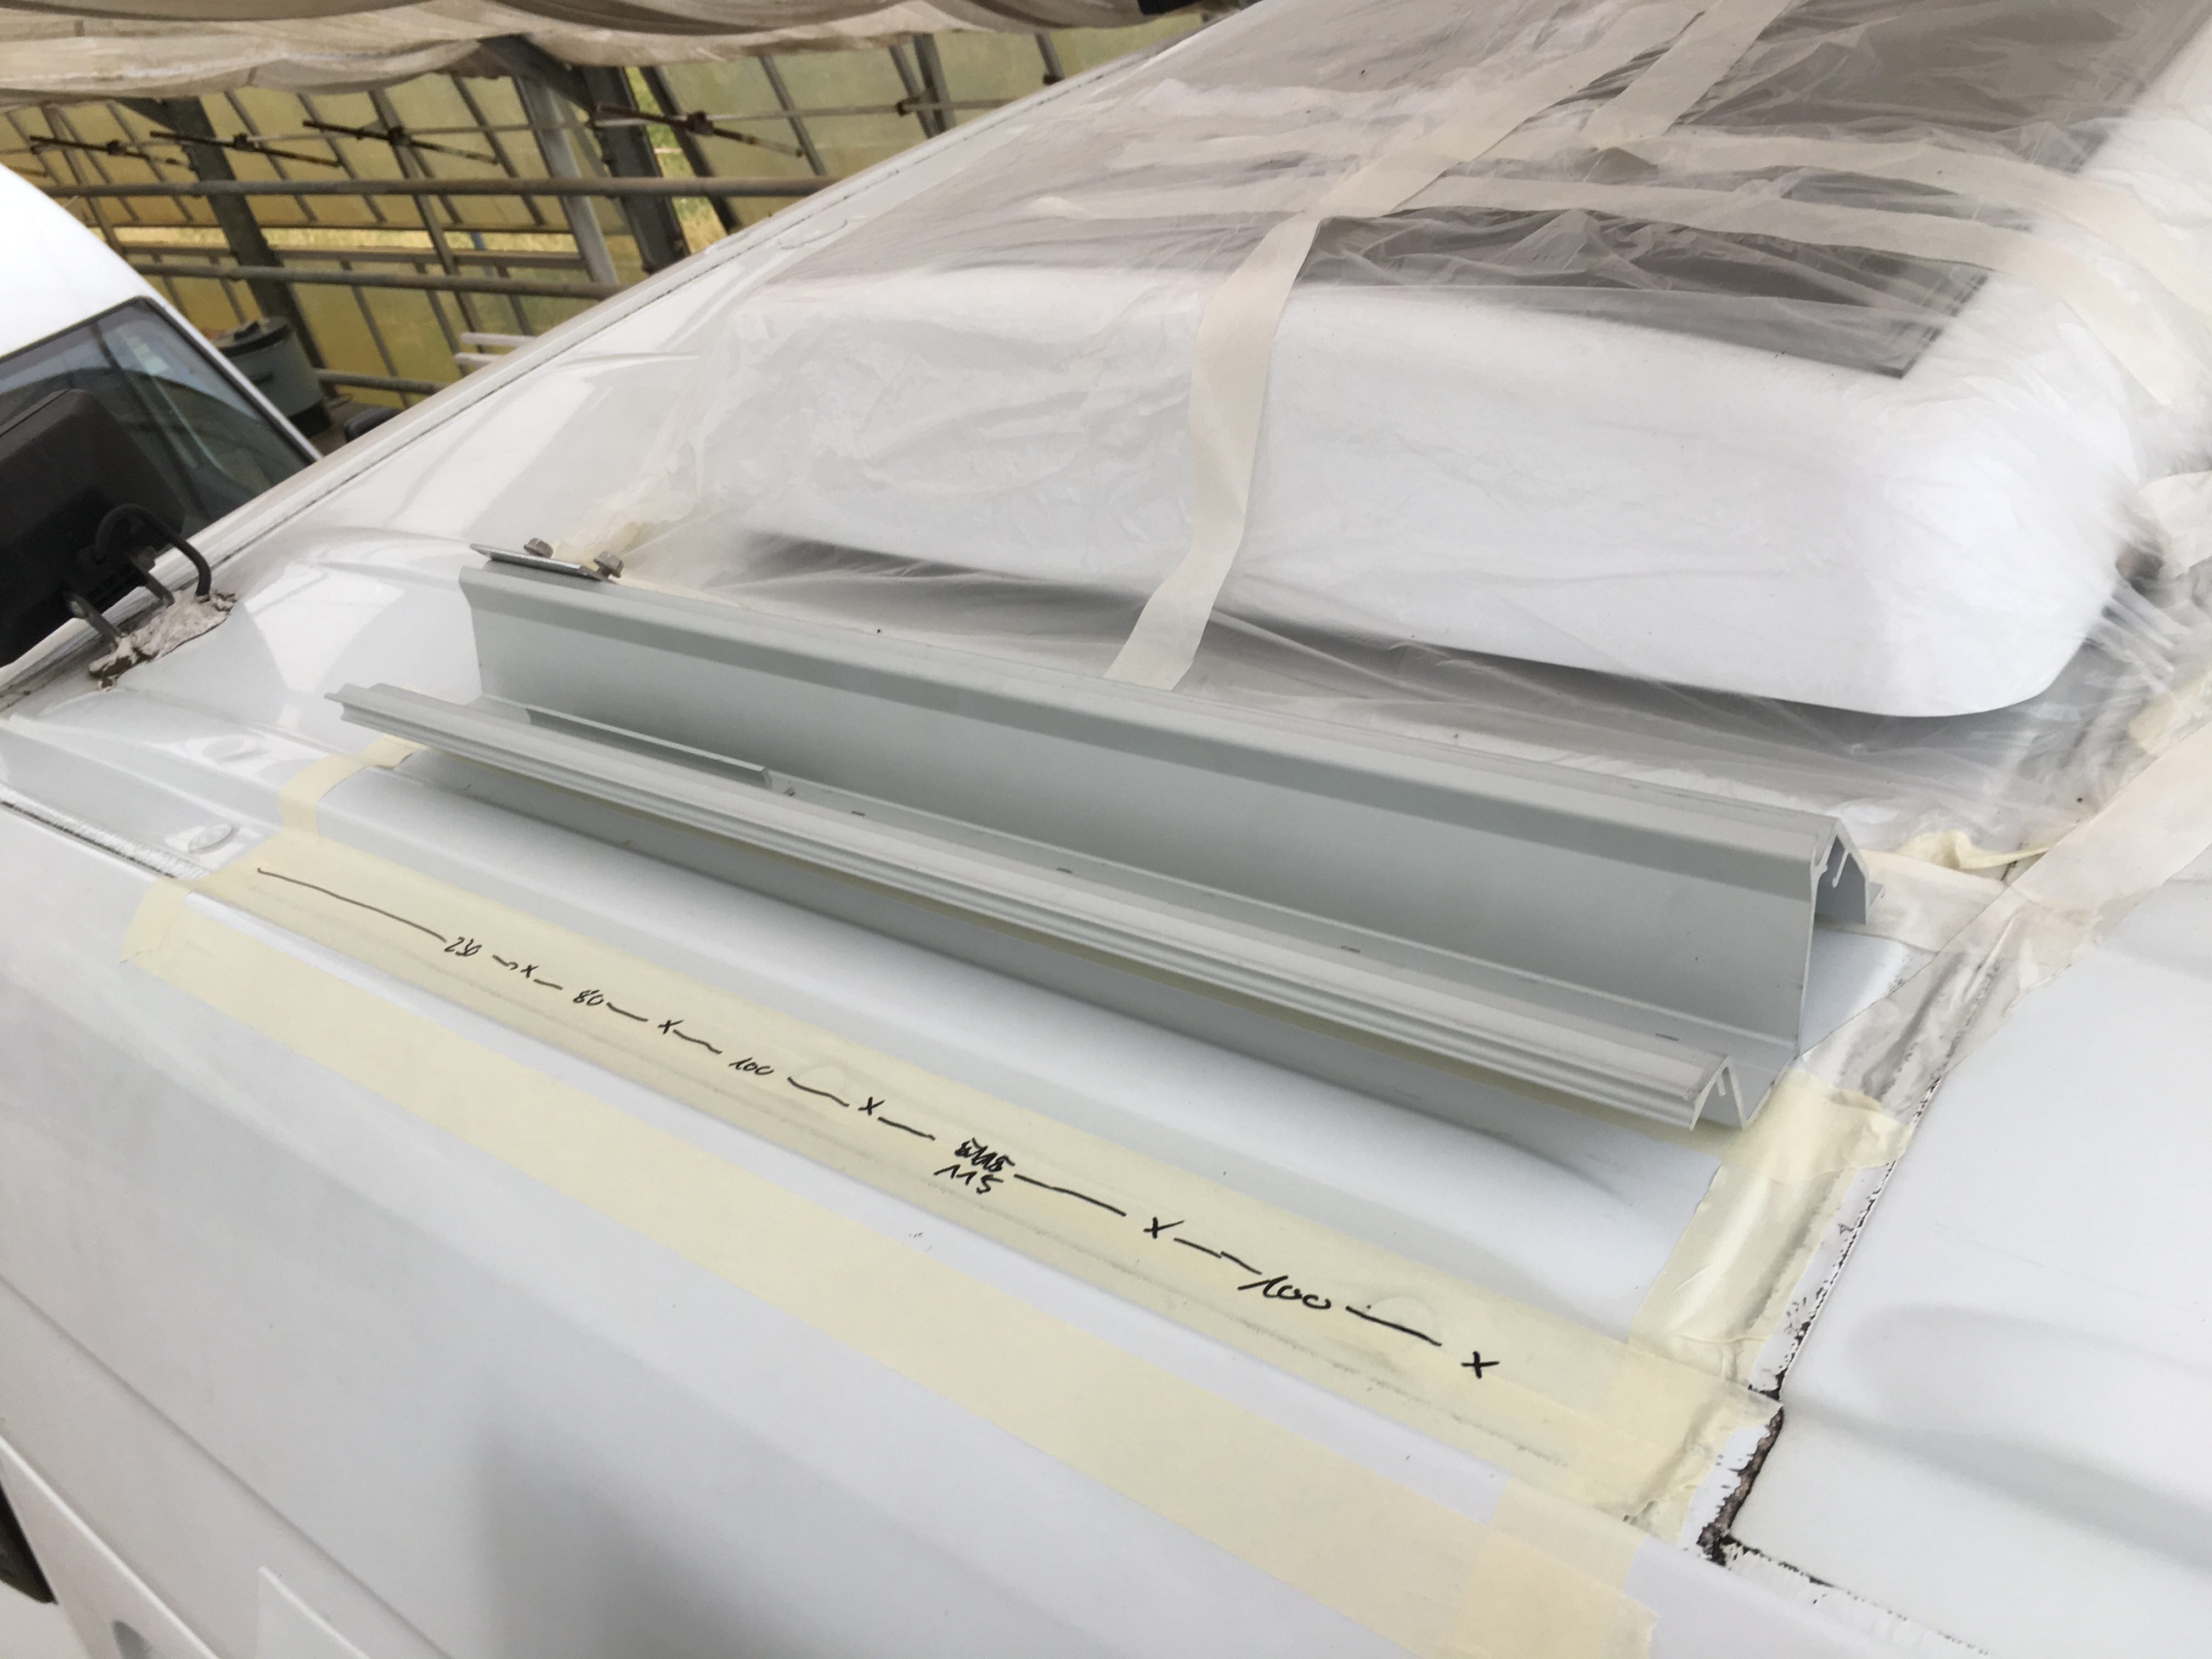
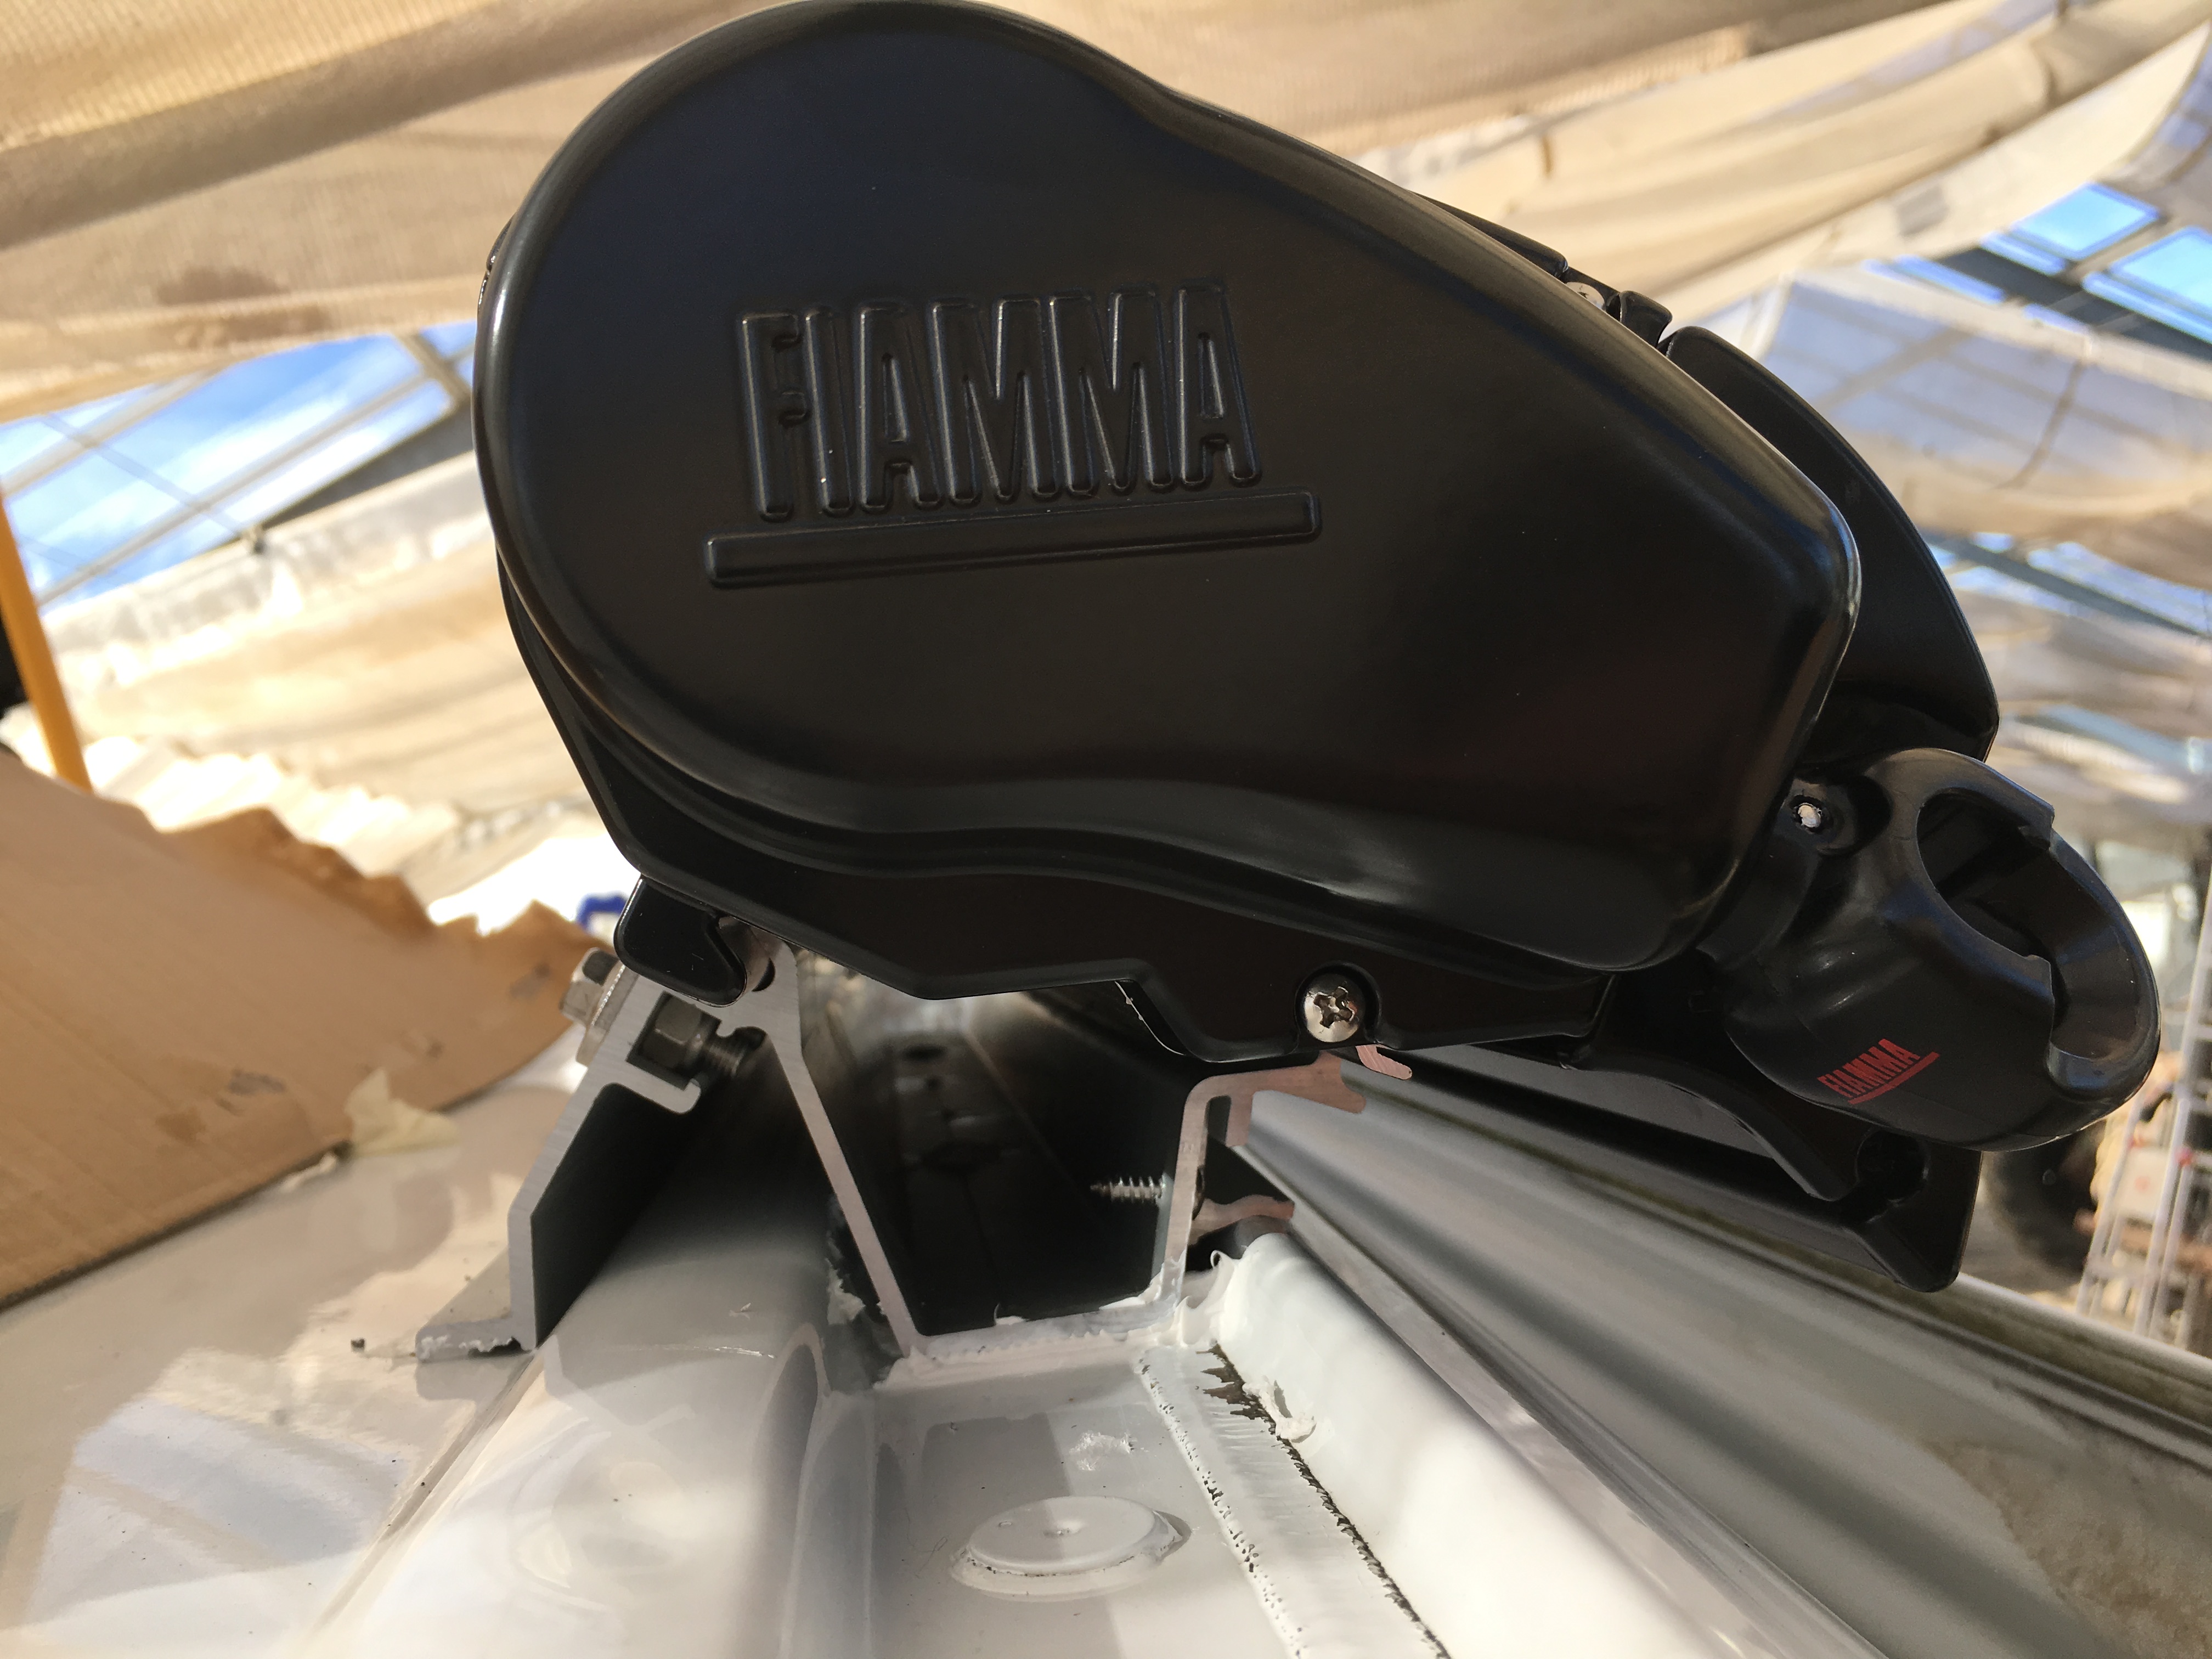
First of all we removed all the dirt off of our roof to work better 😉 When placing the awning or rather the brackets, you should notice the following: On the backside of the awning there are stickers in the front and the back saying “SUPPORT”. The awning has to be installed in a way that the stickers are aligned with the two big brackets (53 cm/front, 60 cm/back). This is very important because that is where the attachment of the arms is on the housing of the awning. The third, small bracket (12 cm) only functions as support and has to be placed in the middle.
With this in the back of our heads, we measured 290 cm along the vehicle and realized we cannot move the awning back or forth a lot. To decide on the final position of the awning we kept in mind that we want to use the brackets for the supporting legs on the vehicle. The front vehicle bracket is mounted to the B-pillar. For the back vehicle bracket it is important consider that you still want to be able to open the sliding door completely (or it will collide with the supporting leg).
Now we had to look after the “SUPPORT” stickers that were pretty much telling us where to position the brackets. We measured the distance between the stickers and the pre-drilled holes in the brackets and then took a look at the bars on the inside. We changed the position of the brackets only a little because we did not want to drill holes into the bars. This worked out fine for four of the five holes, the fifth hole will to be made directly into the bar or rather end in the middle of the bar – it was quite fiddly to tighten the screw.
We added the adjusting pieces to fit the curve of the roof and noticed that the front piece (in our case) did not sit right where it should. This way we could not use the pre-drilled hole for the fixing of the adjusting piece. So we had to drill a “new” hole into the bracket.
After we finalized the position of the brackets, we marked them with masking tape; for visualization and in preparation for the next step – drilling the holes in the right spots.
STEP 3: Drilling and Primer
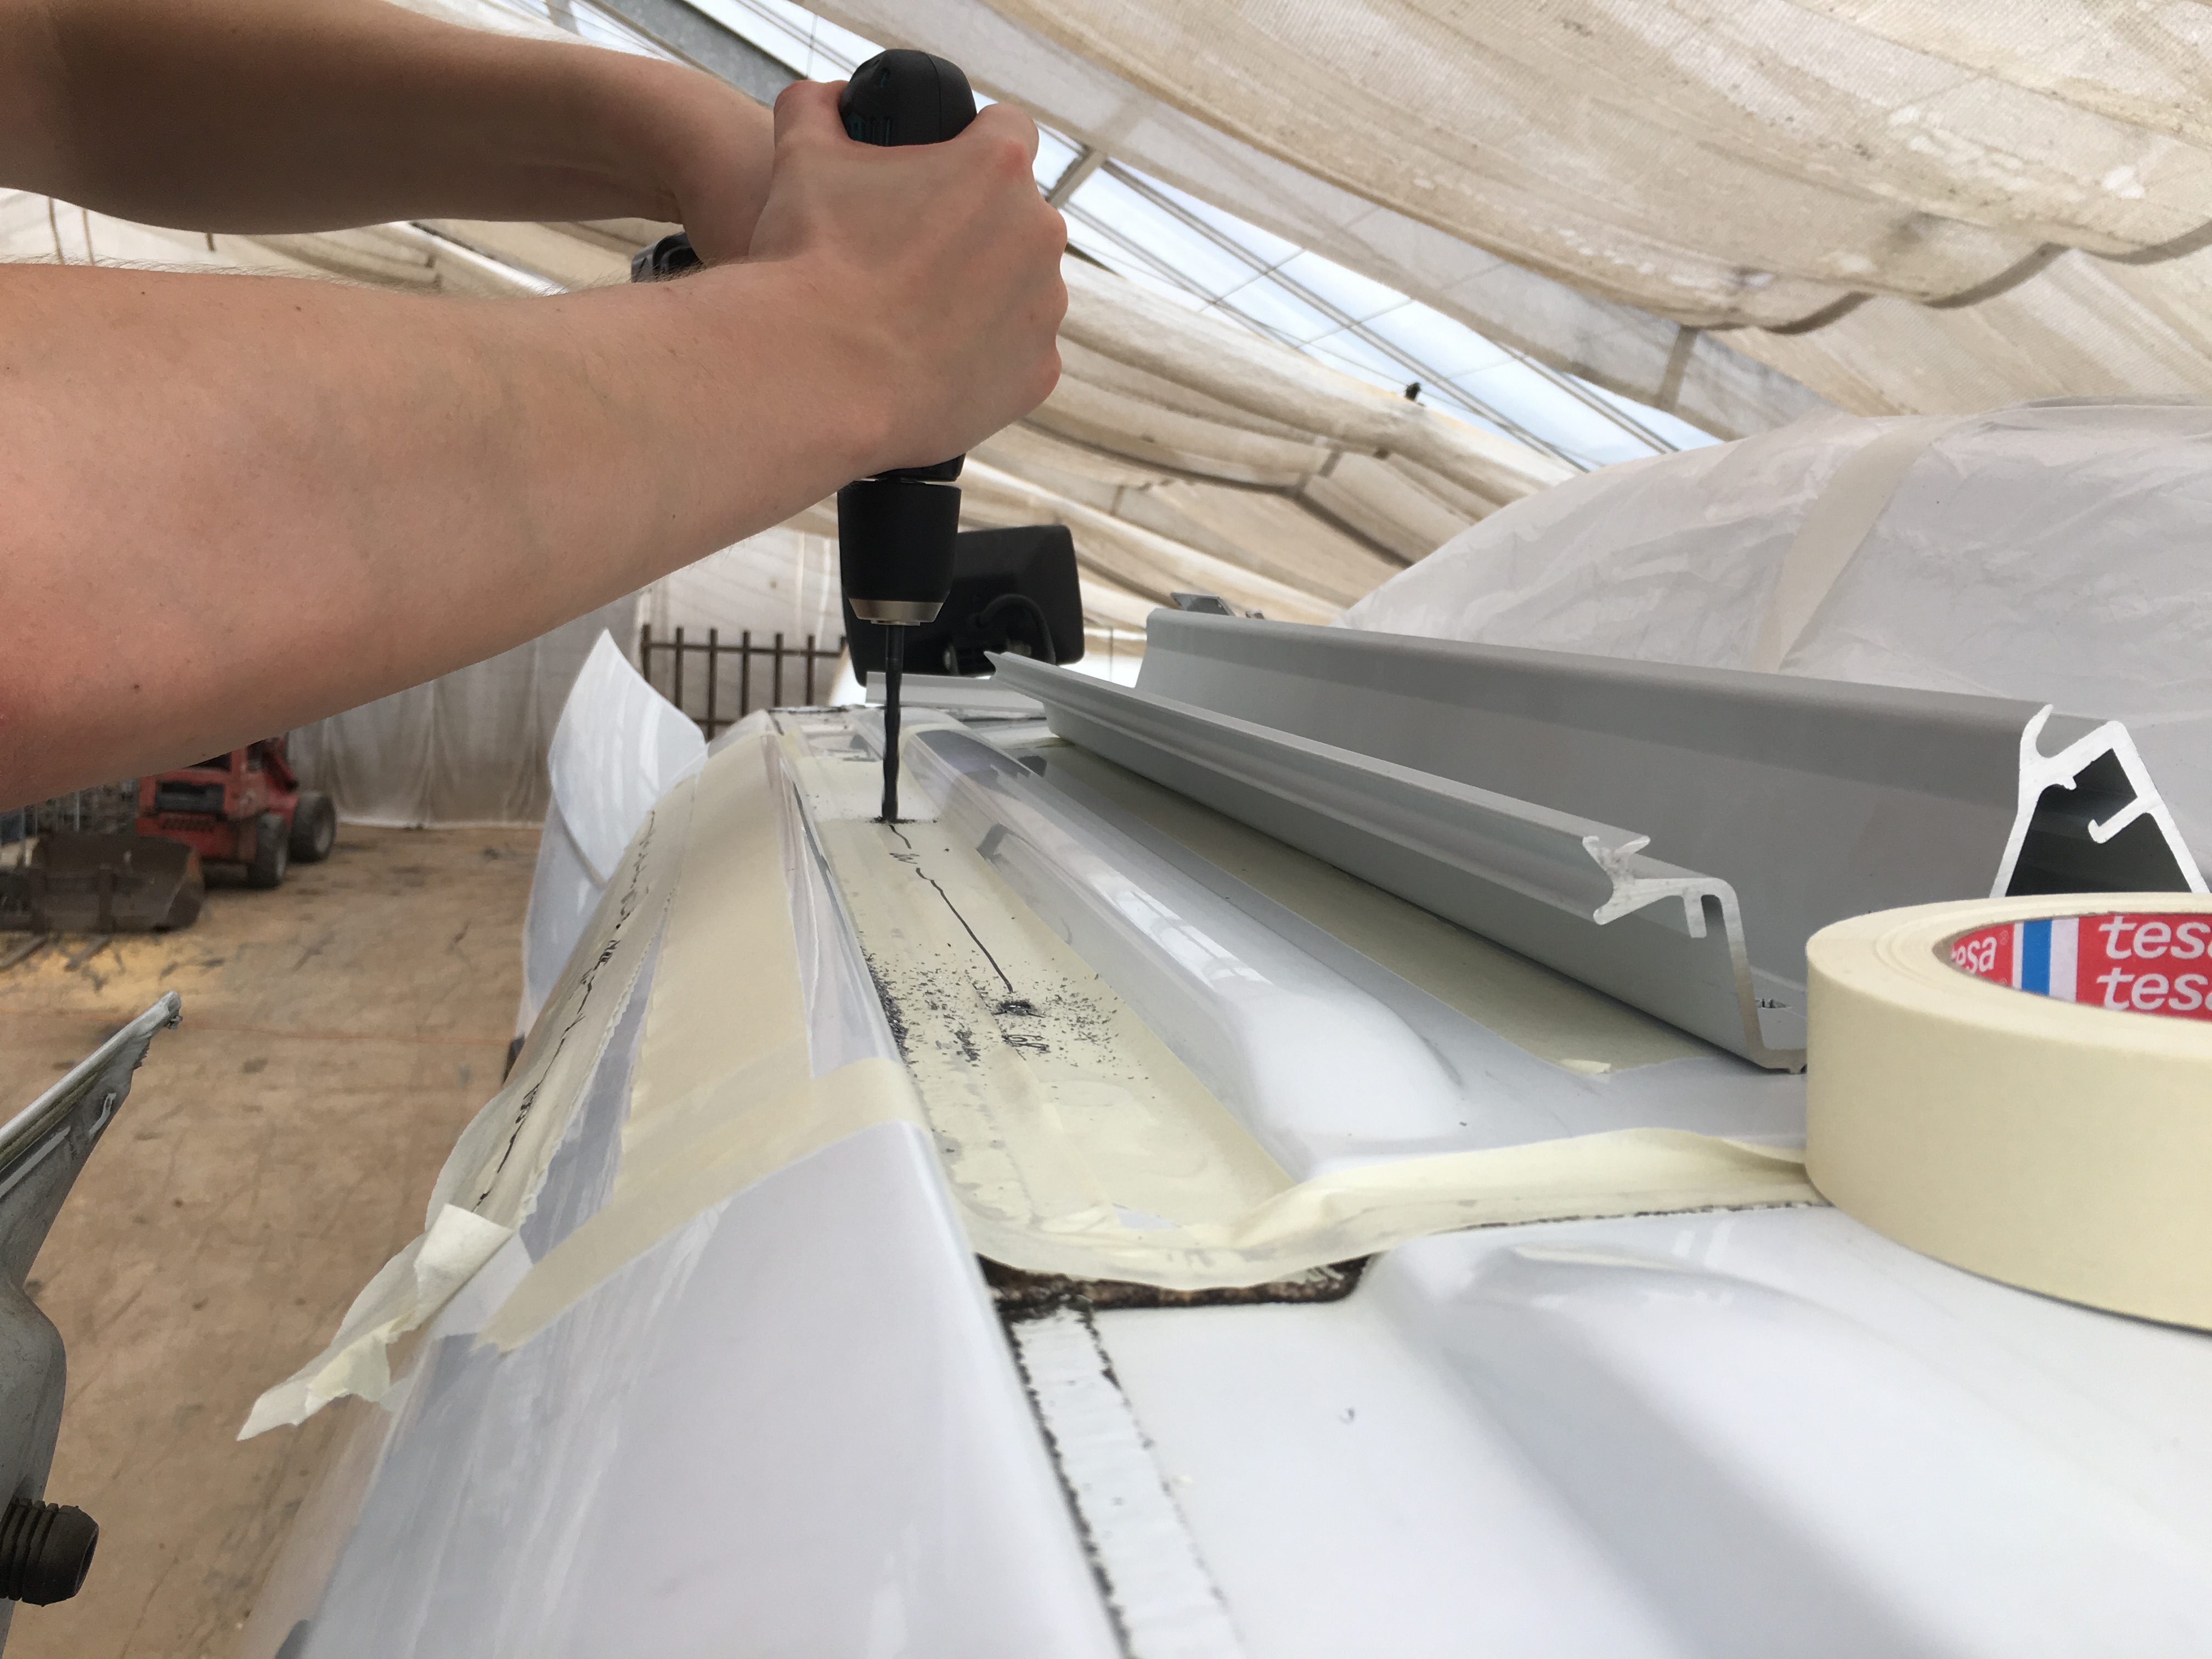
We marked the position of the holes for the brackets on the masking tape and wrote down the distances between the holes just to do the same on the inside to double check. Because we did not want the metal cuttings to be everywhere in the inside of the car and rust away, we made a little makeshift catch out of a garbage bag 😉 we could have used a vacuum cleaner but we just did not have one there. And then we drilled the first holes into our Sprinter!
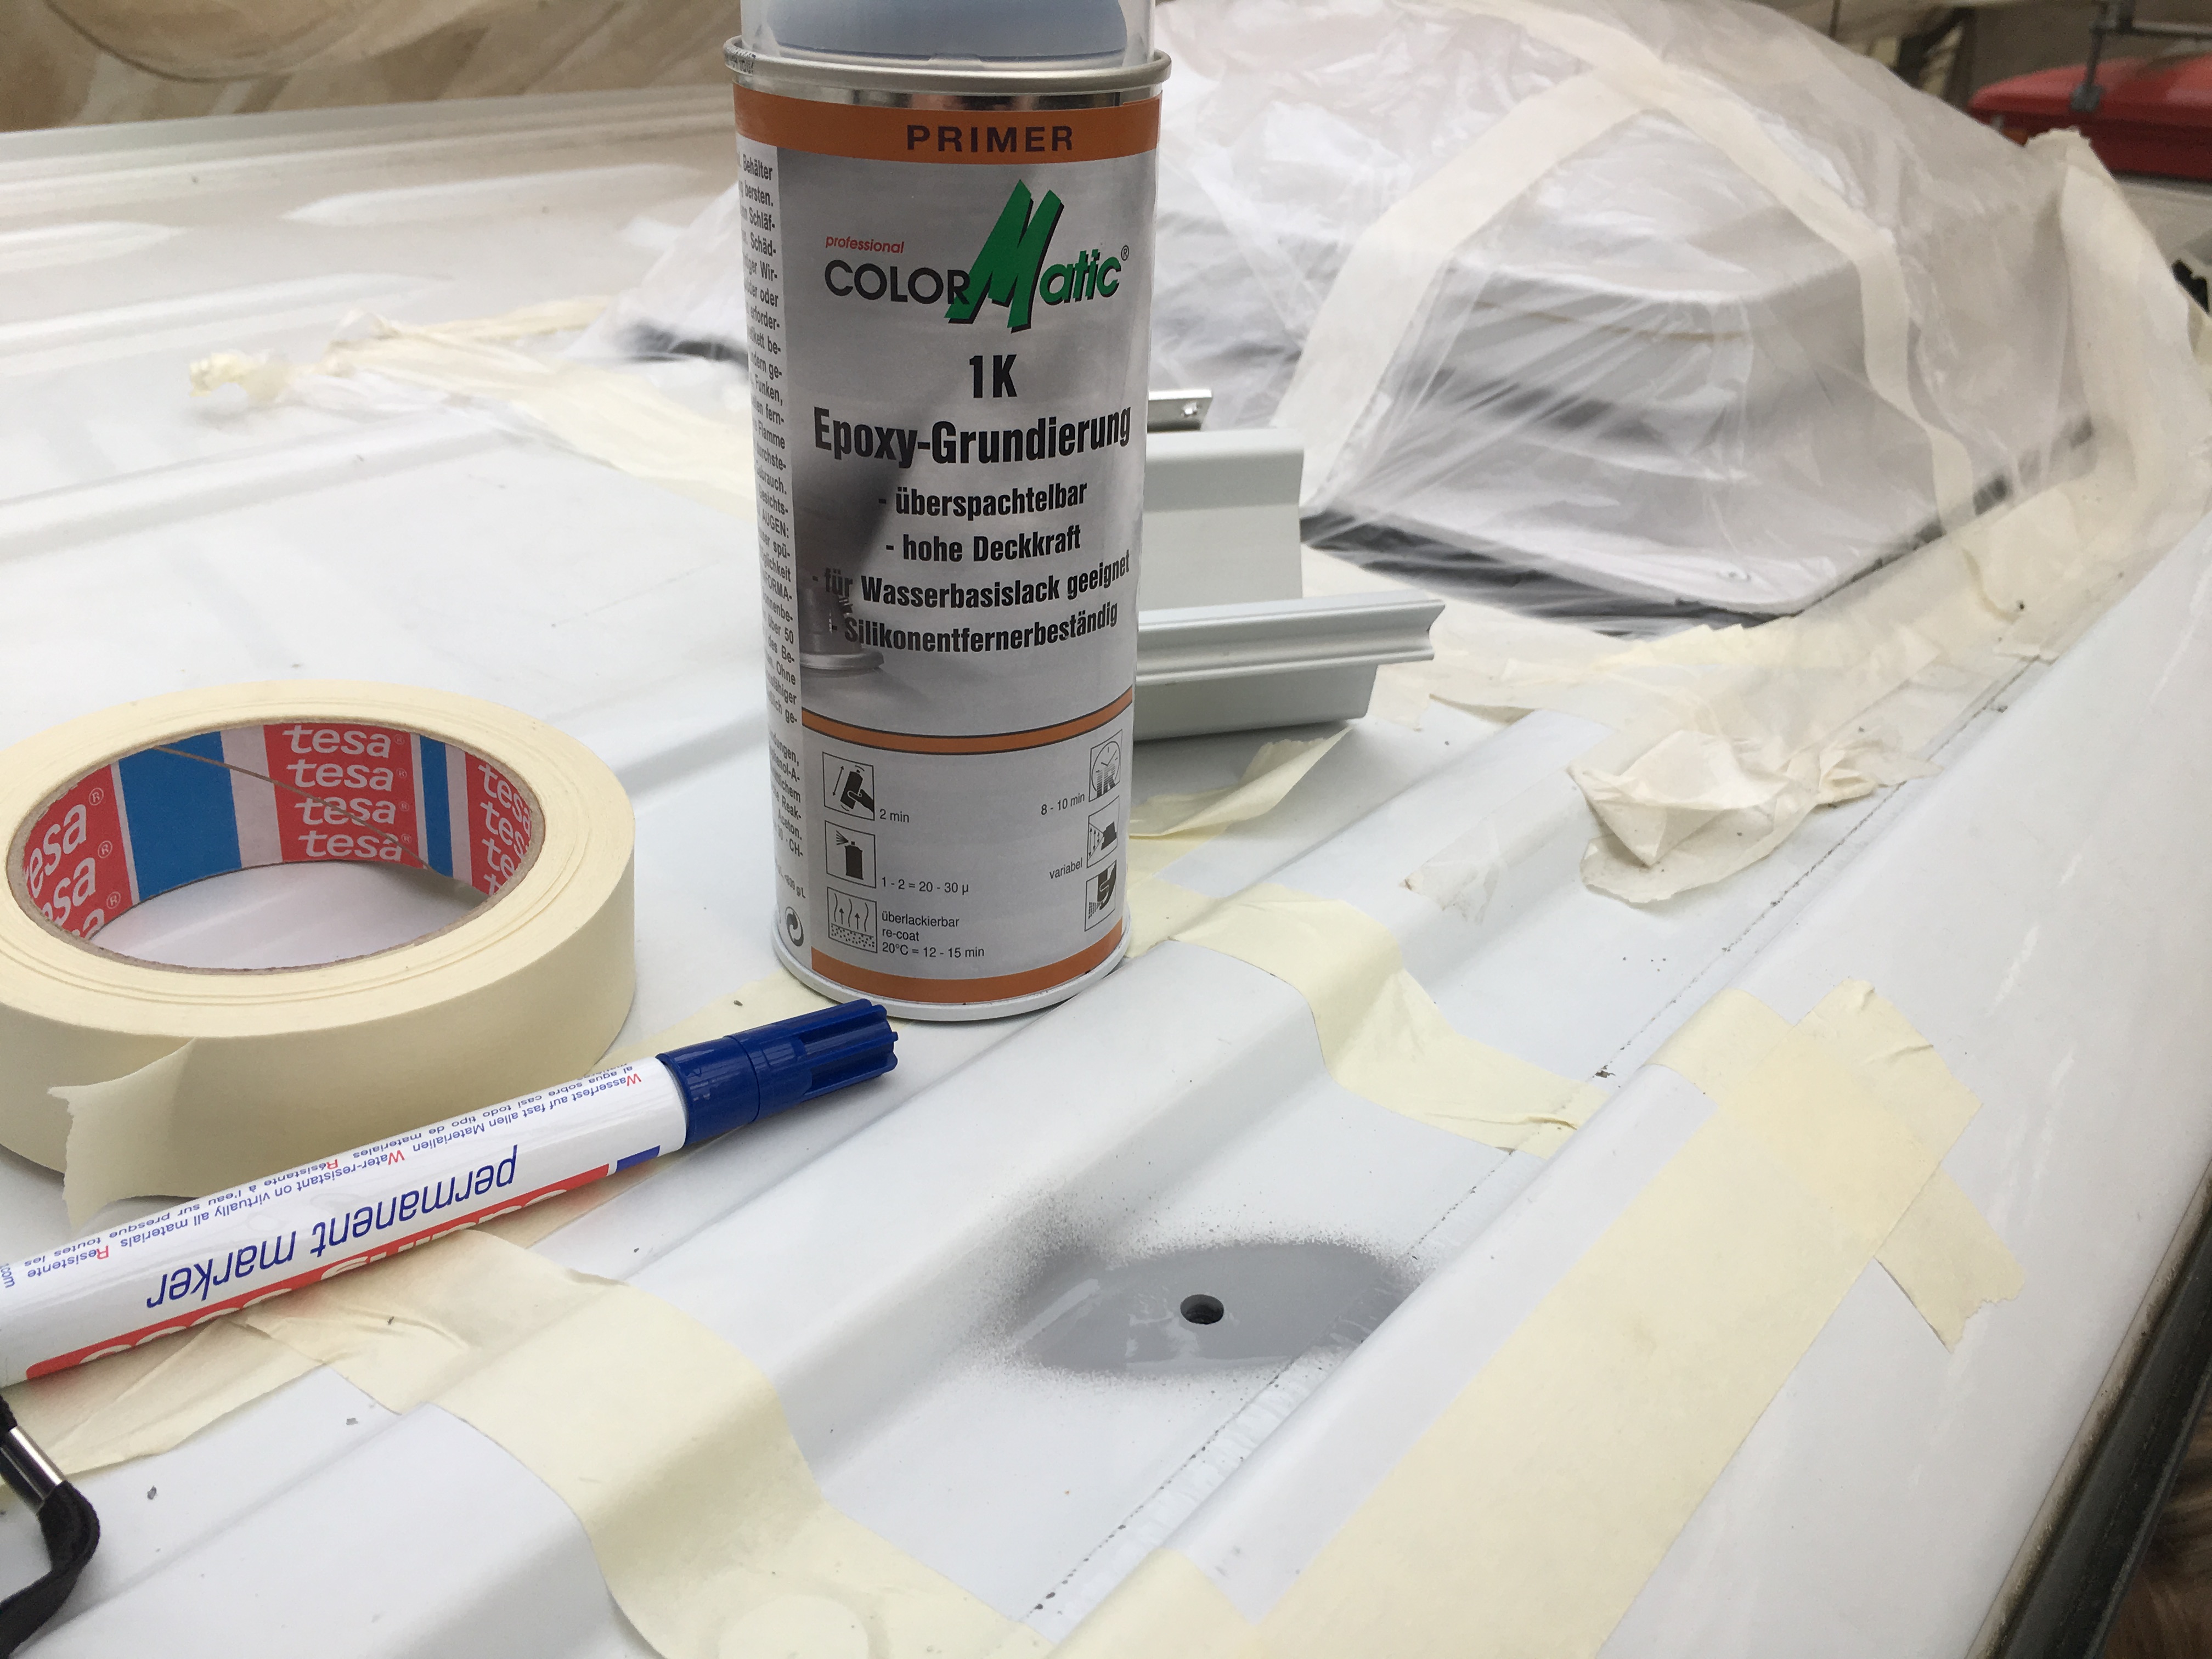
To protect the holes against rust we used this greyish primer (or foundation). This was also used for the cut outs of the windows before the wooden frames were built in.
STEP 4: Preparation of the brackets (against the manual)
The installation manual of the brackets tells us to install the screws, self-locking nuts and shims to fix the awning to the brackets when the awning is already on the brackets. But we think this is not possible because the nuts have to be put into a small channel and then placed exactly behind the hole for the screw to be put in. So we moved this step forward because we wanted to make use of the flexibility of the still unsecured brackets, and put the parts on loosely. We again had to realize that one hole in the bracket was drilled too tight for the screw, but we could re-drill the hole without any problems.
STEP 5: Cleaning and preparation of the surfaces
All surfaces had to be clean and dry as well as free of dust and grease. We got a whole cleaning-/gluing-set (originally in view for the solar installation) consisting of Sikaflex 252i, sanding fleece, MT-Activator and MT-Primer.
First off we cleaned the lower surface of the brackets. The adhesive surface was sanded with the fleece, de-dusted and cleaned with the Activator. The manual recommends a lint-free cloth but for this uneven kind of surface we preferred a small brush without hair loss. The Activator had to dry off for at least 10 minutes (max. 2 hours) before a thin layer of the Primer was applied, also with a (new) brush. The Primer had to dry off for at least 30 minutes (max. 24 hours).
In the meantime we cleaned the adhesive surface of the roof. Only older roofs should be sanded with the sanding fleece, ours is quite new, but we still used the fleece. After cleaning the surface with the Activator, again with a brush instead of a cloth, and let the surfaces dry off for 10 minutes (max. 2 hours). The Primer is not supposed to be used on the roof.
STEP 6: Applying the adhesive
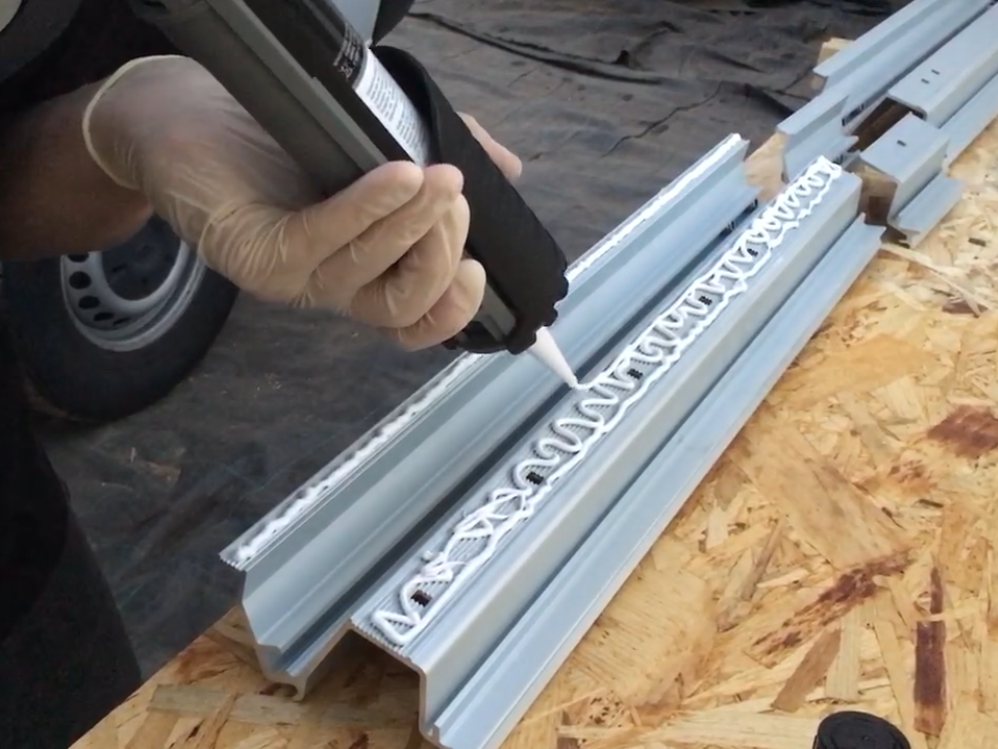
We now applied the adhesive Sikaflex 252i to the clean and dry brackets. First we had to pierce open the cartridge, cut open the top of the applicator and screw it on the cartridge before the whole cartridge was put into the hand press. For an even amount of thickness of the adhesive it is recommended to apply it in the shape of thick caterpillars as well as in a triangle shape.
What else is important: The processing temperature should be between 10°C and 40°C, the best temperature for the material is between 15°C and 25°C. It may sound unbelievable but in the summer of 2018 this was a problem! The temperatures in July were often above 30°C and inside of the greenhouse it was over 40°C. We waited for a cooler day, one Saturday it thundered in the afternoon and the outside temperature was at about 20°C. This was the day we could work at decent temperatures, better for us and the material.
STEP 7: Putting up the brackets and the adjusting pieces

The brackets with the applied adhesive were now put in their marked places and pressed onto the roof. While doing this, the adhesive overflows at the sides, this is fine though, you should just make sure there is enough glue left between the roof and the brackets because the adhesive has to hold these two pieces together for a long time.
The curve of the roof makes it impossible to fit the brackets straight, but because it is necessary for them to be aligned, we used the prepared adjusting pieces so everything turned out well and straight.
STEP 8: Screwing and more gluing (optional)
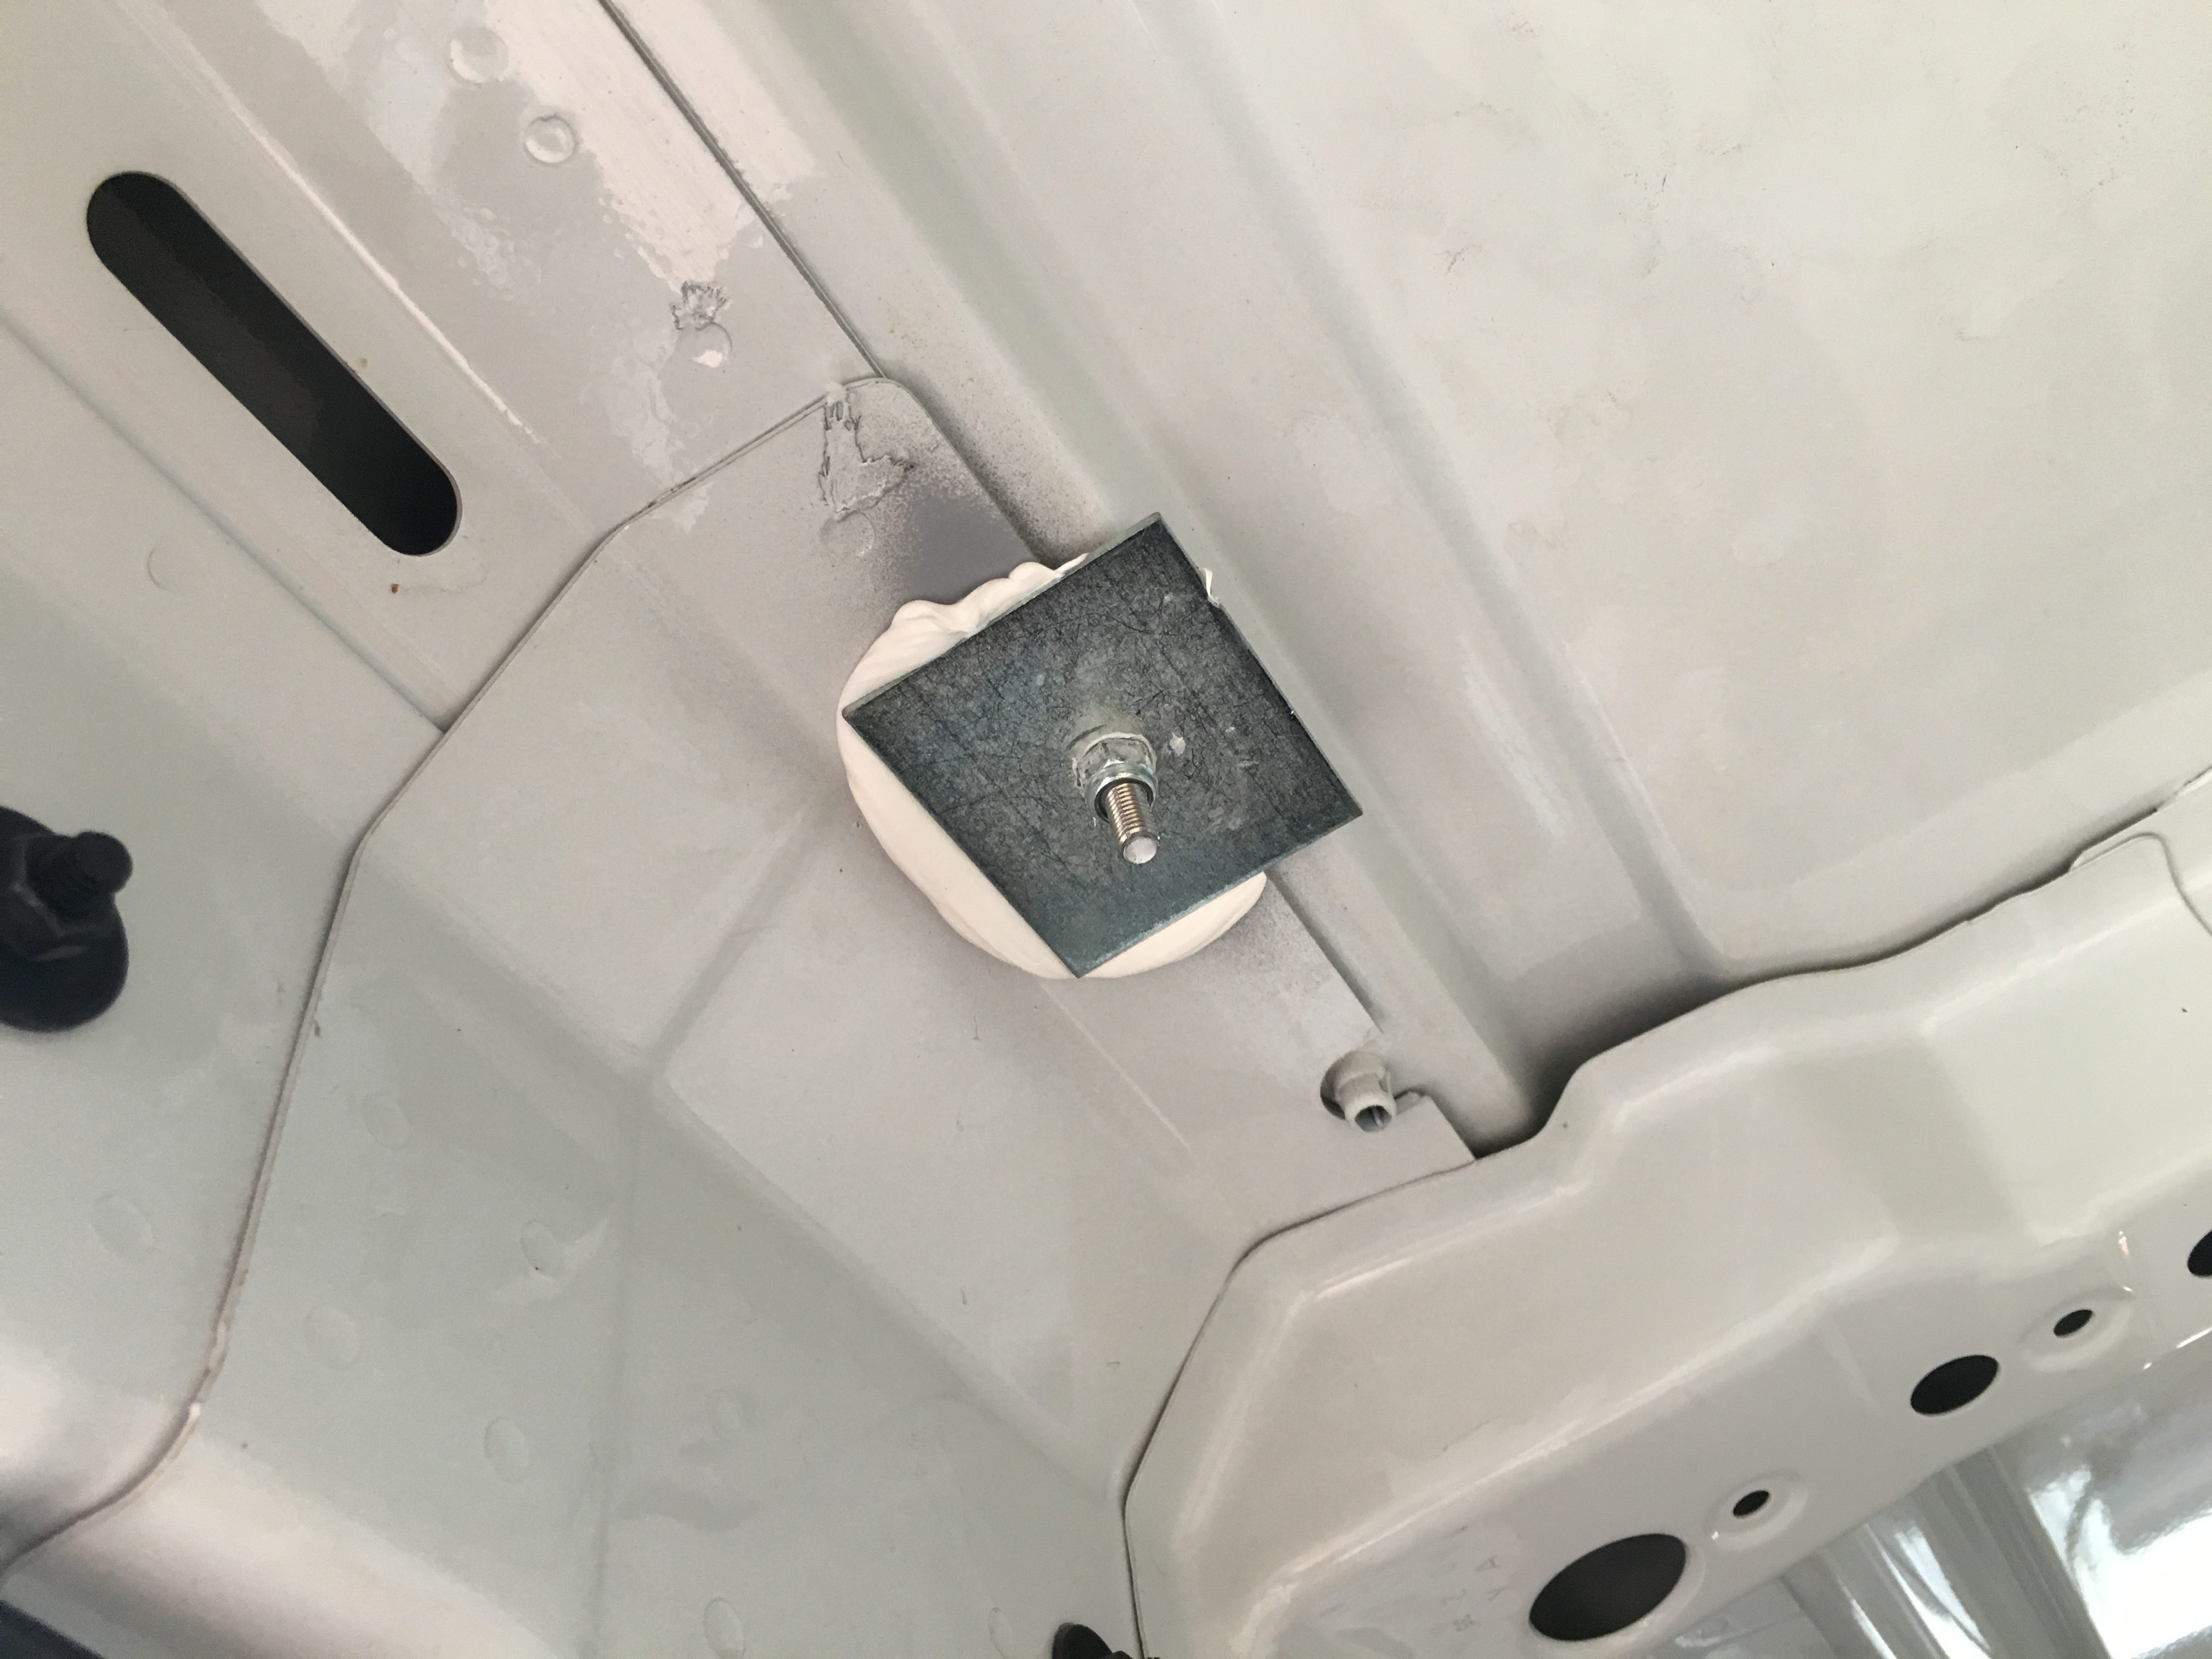
For more support, the brackets were screwed tight from the inside. Self-securing screws and nuts should always be used for something that is constantly moving (like the Sprinter). Additionally, we applied more Sikaflex to the shims.
As already mentioned above, we had to drill one hole into the middle of the bar, but we were lucky it was not sitting on the edge but in the middle. This way we could screw everything tight through the small opening by hand. We could not use the shim but therefore applied even more Sikaflex on the screw.

After the adhesive was completely dried, we again tightened the screws and nuts. The brackets should be checked regularly, especially after the first kilometers of driving to make sure nothing is shifting.
STEP 9: Putting up the awning
The awning weights 25 kg, is 2,90 m long and has to be put up to about 3 meters. In the manual it looked easy because on the drawing the vehicle was about as tall as the people putting up the awning. But it was not that easy. For the two people, we would recommend two big and strong men, maybe even a crane 😉 But we were only one big and strong man and one small and strong (well, not that strong) girl.
We put up one ladder each to the right and left, each of us took one end of the awning, we stepped on the ladders and latched the awning into the brackets, keeping an eye on the “SUPPORT” stickers to be where the brackets are.
It was already dark and we were working with only some headlights on, the awning was just a little bit too heavy for Ines to put it up and latch it at the same time – but it all worked out just fine!
The parts we loosely put on in Step 4 were now tightened and therefore the awning was tightened to the brackets. With some last screws the plates were secured to the awning and therefore to the brackets.
STEP 10: We have an awning!

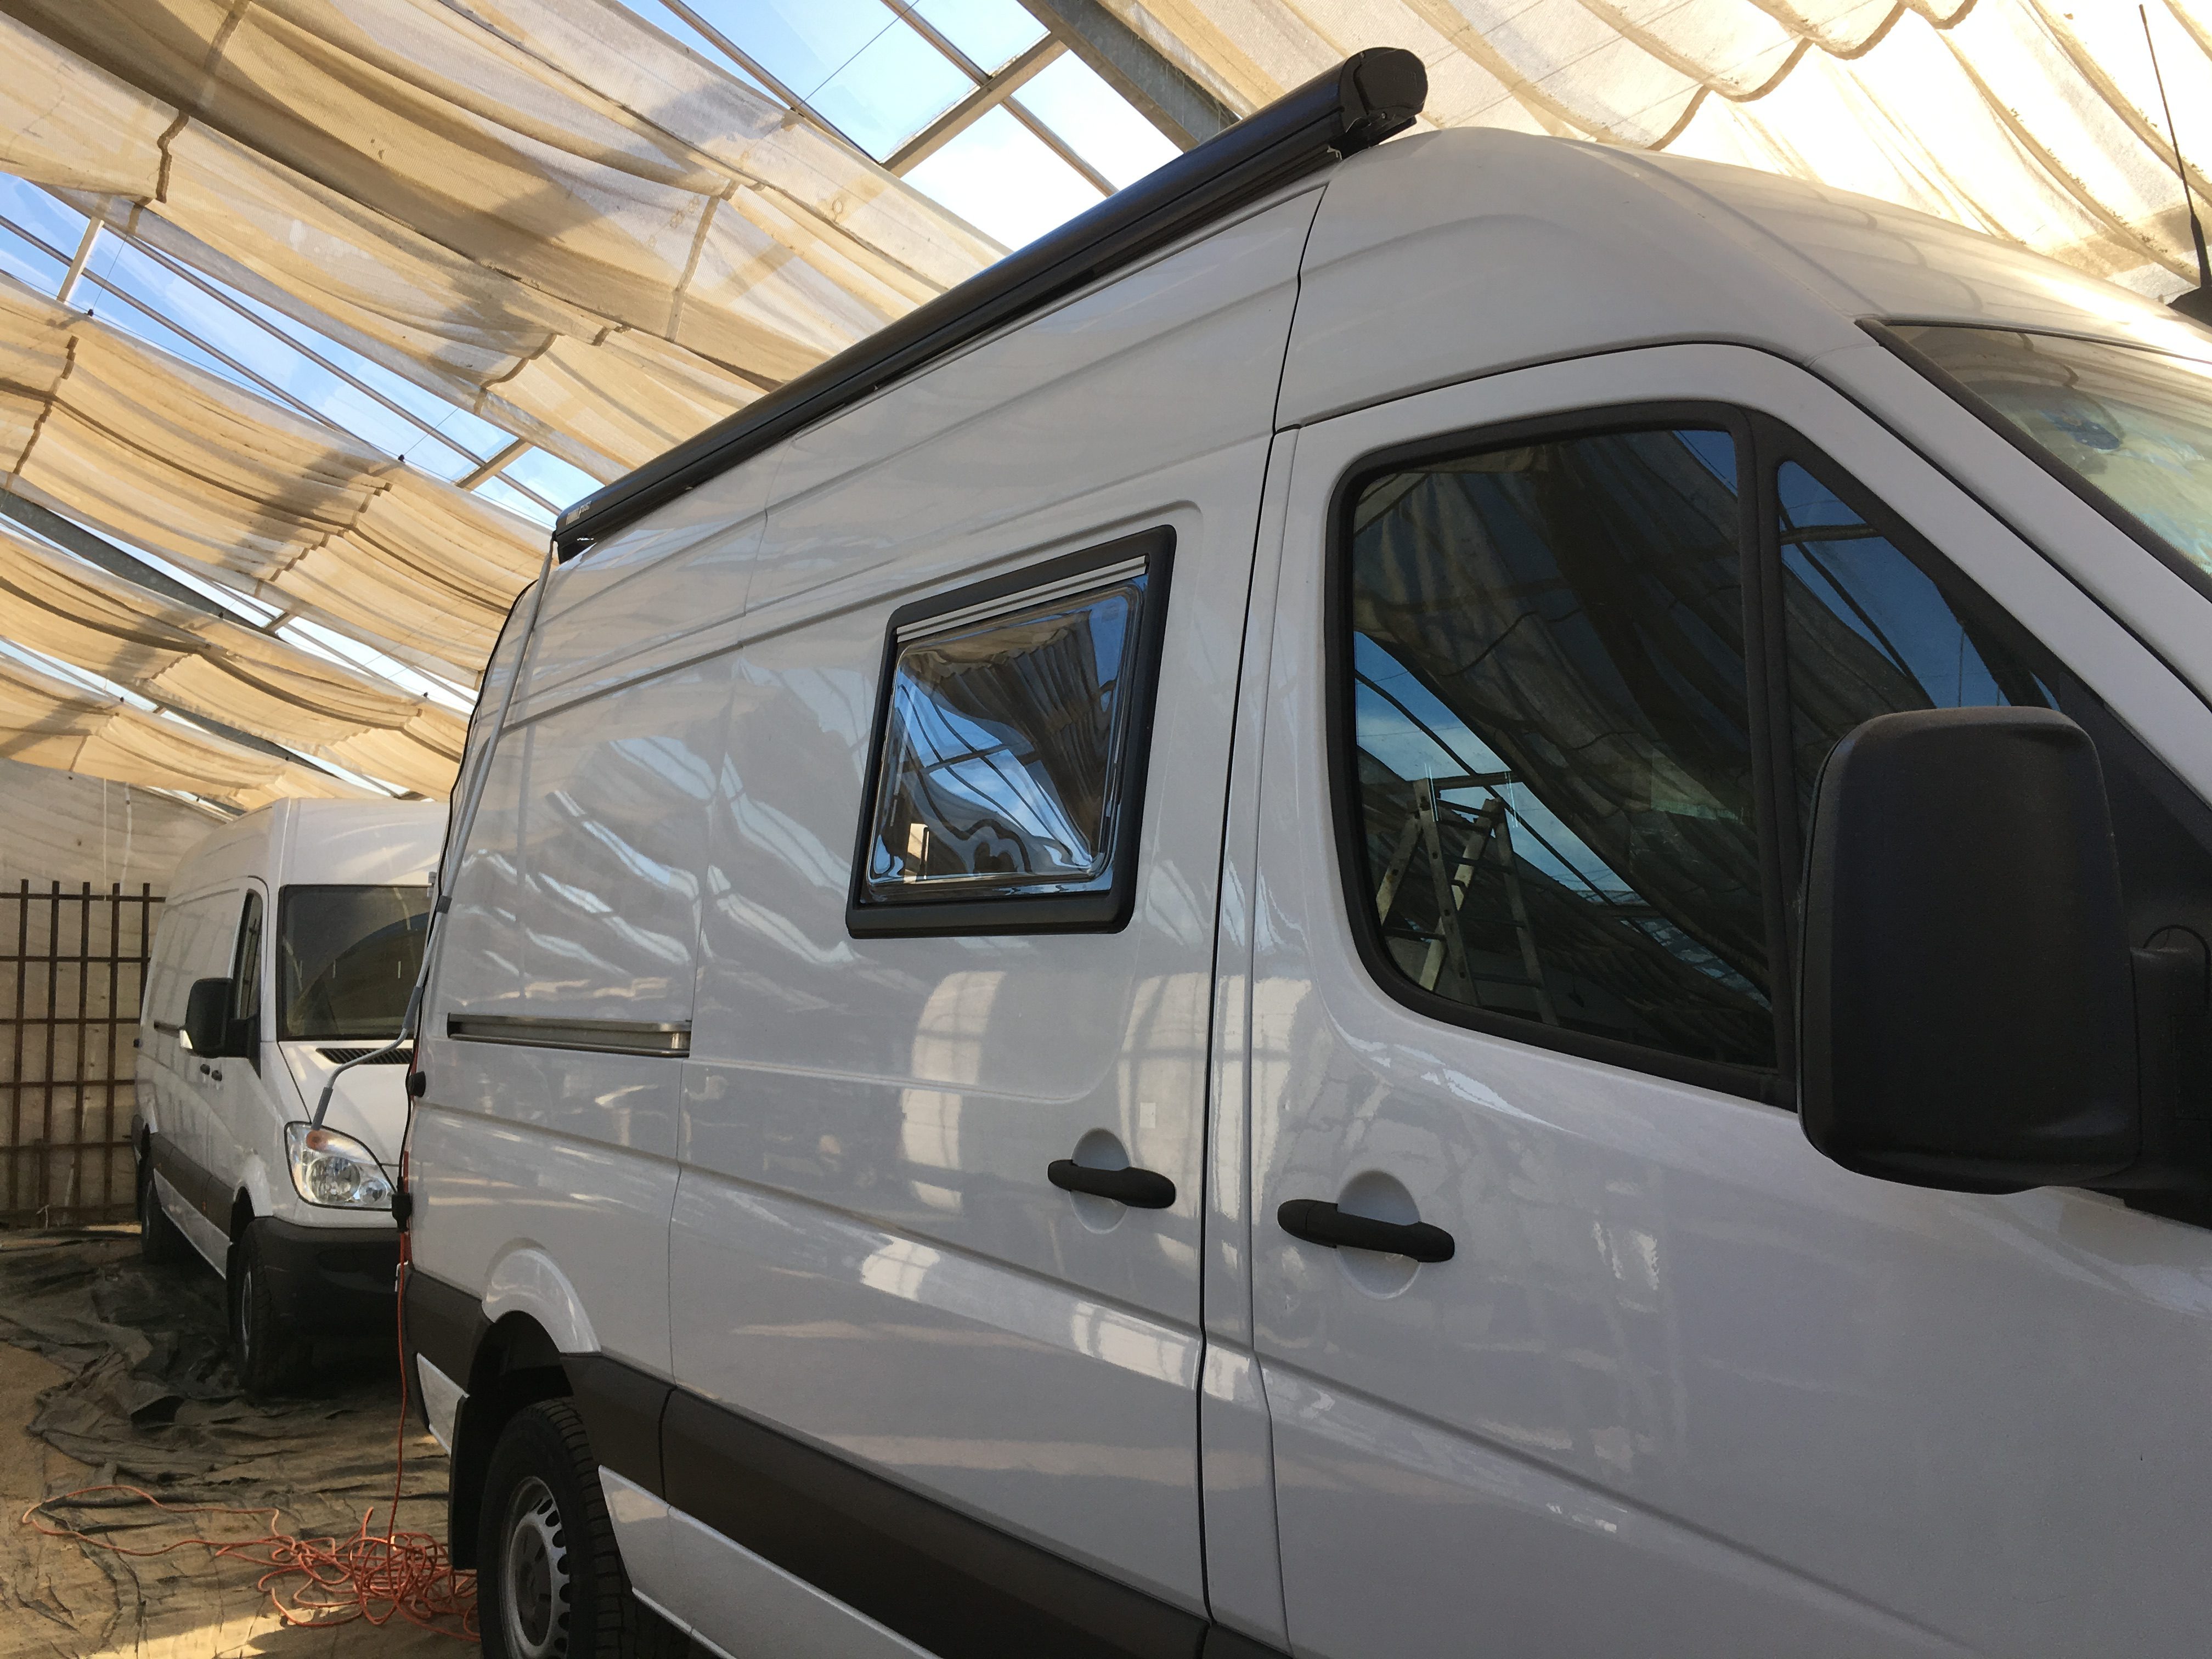
Here it is, our new awning Fiamma F65 S! It offers shade from the burning sun and protection from drizzle, doubles our living space and is our little patio with an ever changing garden.
In Part 2 we will show how we mounted the brackets to the wall of the vehicle, in Part 3 which accessory we installed.
We used the following products for the installation of the awning:


